Showing posts with label pz kut. Show all posts

Wednesday, November 23, 2022

Carving Stuff

Procrastination has ended (at least for one specific goal). I have finally started working on possible designs and carves for my Christmas card this year - and also invoice images! I'm not sure this is going to be the winner, but it's what I've been chipping away at for the last couple of days.


I know, I know! I carved a deer in the snow a couple years ago, but this image called out to me. I'm going to have to put it aside for a day or two to see if my opinion of it will improve with a little distance. 

Also, remember way back in August when I told you that I had scraps and bits of odds and ends that I would include in your package if you asked? Well, I still have some, have found more experiments and have created some new ones. This is what the pile looks like at the moment, as it sits on the packing table awaiting requests.


There is quite a variety of bits and pieces including PZ Kut (yes, really), Firm Kut, OZ Kut, Tan-Z Kut and a number of things that were experiments that I never had full runs made of.  As you can see, some of these have images already on them that I decided I was never going to carve, but a quick acetone scrub would fix that (or flipping the block over and using the other side). These are great for inchies, hitchhikers, fleas, bits of text and other small carvings. So, if I'm sending something your way anyway, just let me know you want a handful of extra odds and ends and I will make it so. 

Thursday, August 18, 2022

Gone Fishing

This will be another one of the Pond Life series. Remember, about a week ago, I said I'd had a good photo night at Pyatt Lake (which is really a sort of large, shallow marshy area with deeper sections)? That was the night I hatched the idea about putting extra carving block bits into customer packages - and if you missed that post, I still have some (https://stampeaz.blogspot.com/2022/08/an-odd-notion.html). Just let me know if you'd like to have a little extra included with your order. 

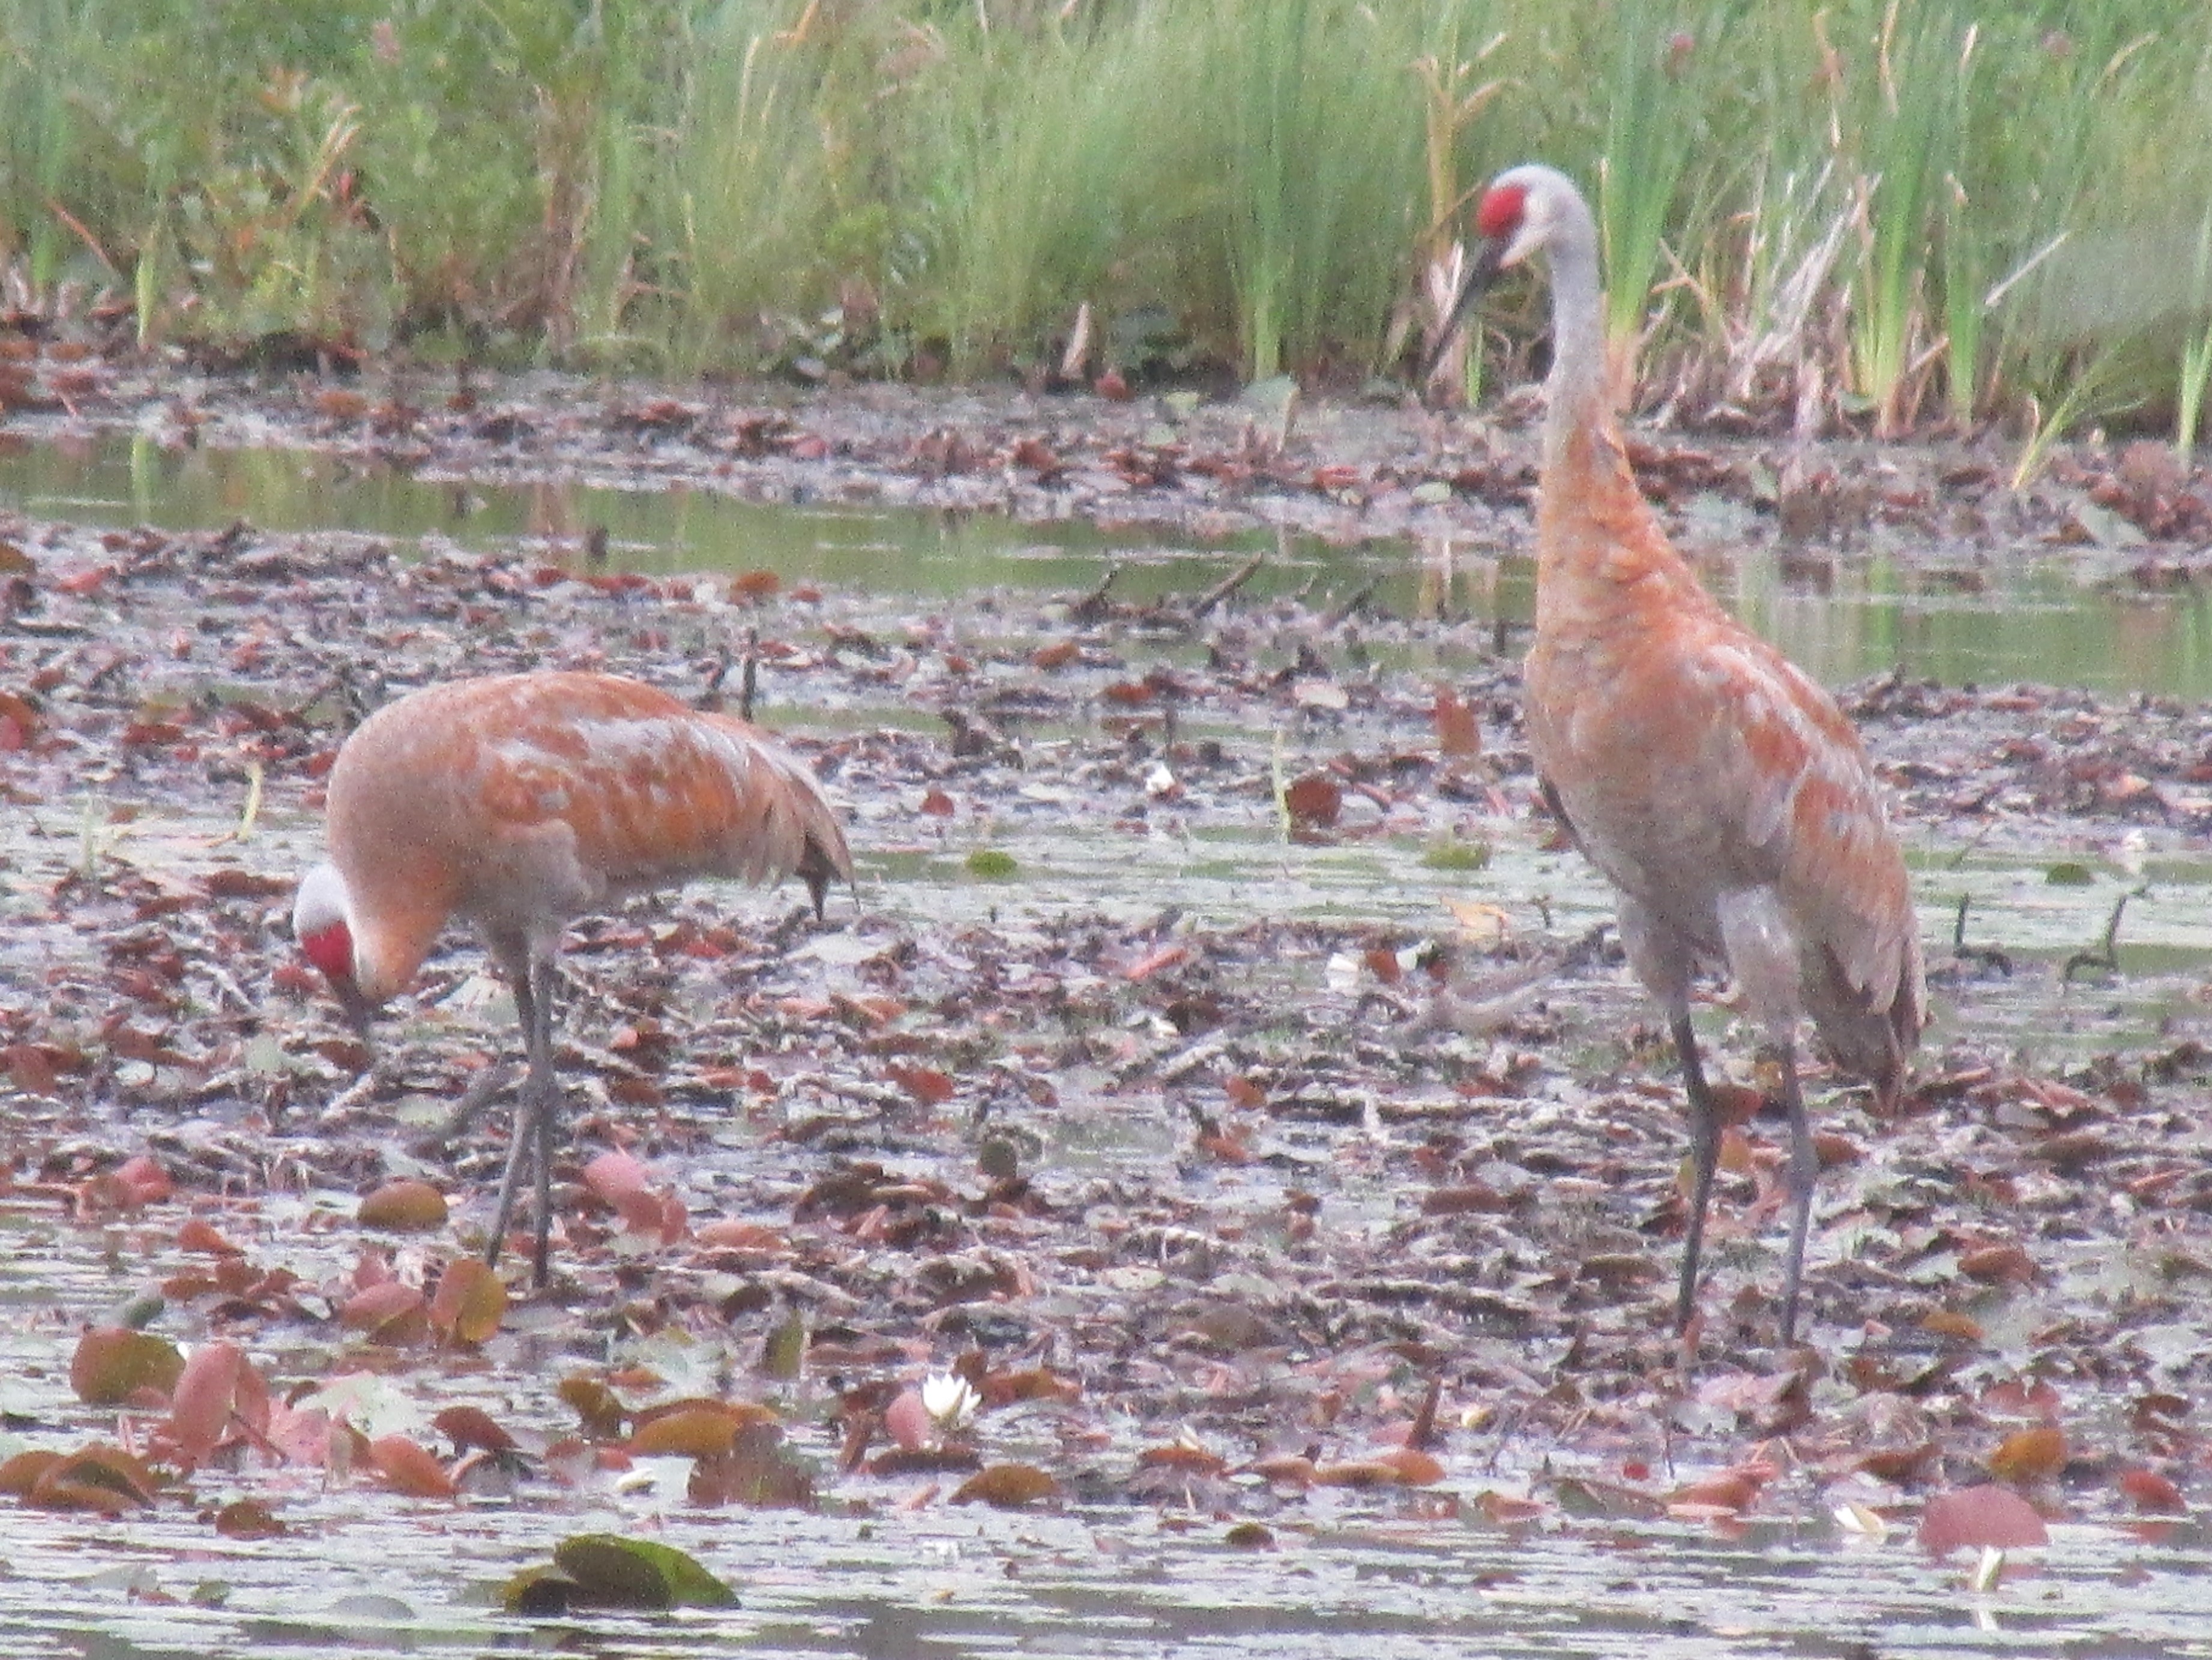
Anyway, back to my story.  As I approached the observation deck, I noticed a couple of sandhill cranes out hunting for fish or frogs out in the lake. 

I tiptoed partway onto the deck very stealthily and got a picture.

Then, I carefully edged my way out a little farther for a better view. They continued their fishing expedition undisturbed by my presence.

I'm not entirely sure what gave me away, but they got a bit agitated and started bugling and clacking their very distinctive call.

I didn't want to disturb their dinner hour, so I quietly backed away, as one of them did a marvelous rendition of the dance of the ruffled feathers. As soon as I was at what they considered a safe distance, they resumed their search for dining delicacies and I continued on my walk to the other observation deck about a half mile away.

When I got out to the second platform, I noticed this great blue heron perched on a dead tree in the middle of the lake, not too far from where I stood. It looked me over, but didn't seem too fussed about my presence.


After a while, a golden eagle swooped in and perched near where the cranes had been snacking and the uproar was something to hear! They both took off and flew from the threat and I managed to catch a picture of one as it rose above the undergrowth and then looped back toward me.

It settled in a tree right in front of me and just a little to the left of the heron, who observed the proceedings with interest.


It was fun to watch the crane gracefully fold its huge self into a neat, compact package to and wait for the danger to pass.

It stayed for a while, allowing me to enjoy its company, before flying into the twilight to join its mate, which had perched much farther away from where the eagle landed. (I could see the eagle, but couldn't get a good picture because it landed in a very well camouflaged area to watch for its own dining opportunities. It would have looked like a dark blob amongst the leaves.)


After the crane flew off, I watched the heron for a while longer, before heading down the trail for home. 

All in all, a very nice sunset walk. It could only have been made more perfect by the presence of a large black dog quietly watching by my side. But, you all know that's true!


Monday, August 8, 2022

An Odd Notion...

I was walking around Pyatt Lake taking pictures and thinking about things, as I often do. (Good picture night tonight, by the way...) And I had an idea.


Over time, I have collected quite a pile of carving material odds and ends. There are pieces from very small to reasonably large with quite a few that would work well for people who like to do inchies, micro boxes, hitchhikers, or other small images. I will never, ever be able to work my way through all these pieces of material, given the rate that I am generating them as opposed to how often I carve that size. 

Therefore, if you want to take pot luck and ask for a fistful of miscellaneous bits and pieces to be added to your order (at no extra cost to either of us, since I'm shipping something already), or if you know a deserving soul who can't afford to buy any material, let me know. 

Some of these blocks are from many years ago and come from ideas, samples or tests that  I have put aside and will never revisit. For example, if you are someone who uses acetone and can clean off the surface of a block that has something dubious transferred to it already, there are pieces of Tan-Z Kut, PZ Kut, OZ Kut, MZ Kut (I think) and other materials that only I ever got to play with. There's no reason for me to continue to let this pile keep growing and I like the idea of getting it into the hands of people who will actually carve it into something interesting. 

What do you think?


Thursday, April 5, 2018

Tan Material Sample Results Round #4


Unless the two extra folks I sent samples to (who weren't in the official Merry Band of Testers) send back information and/or images, I think this is the last sample post you'll be subjected to for a while. 

Once again, thanks to nosox, Wise Wanderer and Open Space for their very helpful suggestions with respect to questions to help all the testers in their analysis and evaluation of this new material. It created a perfect springboard for thinking about material qualities and getting similar pieces of information from a wide variety of carvers. 

Also, even if you aren't interested in the actual results of the sample test, the carves are definitely worth an admiring look. 

What, if anything, did you to do prep the block before transferring your image?

One treated one side with acetone and left the other untreated on one of her carves (noted in the scans), one lightly sanded her text carving and did not prep the other, one did a very helpful side-by-side comparison of how sanding or not sanding the material affected the transfer outcome. 

What type of transfer did you use?

There was a wide variety: heat, wintergreen oil, acetone/laser jet print, and wax paper.

Did it take a transfer well?
Is the transfer clear and high contrast, showing detail well?
Does the transfer stay on the material without smearing or sliding?

All transfer methods worked reasonably well to very well, except for the wintergreen oil transfer onto one of the blocks that was not sanded. 


Many thanks to BaliWho for doing a test of prep and transfer methods. From the left, sanded with heat transfer, not sanded with heat transfer, sanded with wintergreen transfer and not sanded with wintergreen transfer. It's pretty obvious that the sanding really helps the transfer process with this side-by-side comparison. 


What tool(s) did you use?

Staedtler #1 V - modified and unmodified gouges, x-acto knives, unmodified Speedball #1, #2, #3 and #5 cutters, and a pinched .25 Speedball #1 cutter. 


Using properly sharpened tools, does the cut path have clean edges?
Is the consistency of the block smooth or grainy?


Edges were clean and the material was smooth for all three testers. 
Many thanks to Baliwho for some very helpful side-by-side comparisons. She carved what she calls the "Vampire Zombie Clown Molly", even though the transfer was problematic for her, just to test the inking qualities after the carve (above and beyond the call!). Clearly, sanded worked way better. And, by the way, I loved the Euchre carving - I used to play that game with my family when I was a child. Lots of memories there. The largest carving in this group is Rachael Ray at about 1.5 x 2 inches. 


Does the gouge or knife slip during shallow cuts or when ending cuts?

One said she slipped a little using extra pressure on cleanup cuts and thought that it was a matter of adjusting to the fact that it doesn't take as much pressure as the material she's been using, one slipped a few times, but also felt it could be adjusted to, one had some trouble with slipping as she felt her tools got duller and she needed to use more pressure on her cuts.

Does the material release easily from the block as you finish each cut?

One had a few straggling pieces, but thought it was more her carving style than the material, one thought it released easily, one had a lot of trouble at the end of cuts, especially with her x-acto knife. 

How would you rate the level of pressure it takes to move the tool through the material? 


One said it was soft and easy to carve, requiring very little pressure to move the tool through the block, noting it was much easier on the hands when working on a large, detailed image or doing a lot of carves in a row. One thought that pressure was not an issue and that the material was firmer than Speedy Carve and about the same as OZ. One said it feels just as firm as OZ but takes far less pressure to carve. 

Many thanks to The V's who carved with Staedtler modified and unmodified #1 V gouges, an x-acto knife and Speedball unmodified #2 and #3 gouges and thought this material dulled her tools more rapidly than OZ or PZ Kut. (I think it's very cool her new signature is carved on this stuff!) The larger "Insomnia" image had acetone preparation on the left of the block. "Insomnia" is about 2.5 x 3.5 inches and the new signature carve is about 1.25 x 2 inches.

Rate the ability to make fine straight lines.


One said it was a "dream" compared to Speedy Carve and easy to shave along the second side of a line to get nice, thin detail. One said it was easy to get fine lines and details. One said "very good". 

Can you imagine this block at about .25 inches thick? If so, do you think it would be firm enough to hold fine details, or squishy such that stray background marks would show if the stamp were not mounted?


This group had no concern about the squish factor.

Did you try tools with different levels of sharpness and did it make a difference if you did? 

One said the material seemed to dull her tools and it became harder to carve as they lost their edge. One didn't try different levels of sharpness. One said her tools were at all different levels of sharpness and she noticed no difference. 


What type of ink(s) did you try?


All three of these testers tried lots of different inks. 

Many thanks to kudichan who tested the limits on fine lines and text with a modified Staedtler #1 V gouge, modified Speedball #1 and a pinched (.25) Speedball cutter. She thought the material was smooth and easy to carve and that ink transferred better if the image was thoroughly sanded before carving. The reclining woman is about 1.75 x 3 inches and the text carving is about 1 x 2.5 inches.  


Does the carving hold the ink smoothly and evenly?
Do large positive spaces hold and transfer ink well?

One was very pleased with inking results, saying that it was the best she'd experienced since PZ Kut, especially if the carving was cold - she even froze one of her images and it worked well with all inks except one that was frozen, itself. One said that inking went pretty well on both sanded and unsanded material, with dye ink being a little less evenly distributed and that sanding made more of a difference in image transfer than in inking and printing. One had some issues with printing partly due to the slight curvature of the sample block and she also thought that sanding really helped for good coverage. 

Other observations and comments: 

One noted that black StazOn ink didn't seem to dry as quickly on this material after printing. 

One said that the surface was smooth - like butter, but that it needed more pressure to carve deeply. She rated it as, "Just like OZ, without the pain", saying that she got quickly fatigued while carving OZ and didn't experience that at all with this new material. 

One held high hopes of this becoming her new and everlasting favorite material, but wondered a little about the drier consistency holding up in the wild. 

One really liked the material overall and would use it over Speedball pink, with some concern with respect to blade carving and the dulling of tools. 

Finally, I just really want to thank all the intrepid testers for the amazing work they did, the fast turnaround times and the willingness to answer any other questions I had about their experiences with this material. It's been great to get such excellent feedback and have so much helpful information to move this quest for the perfect carving medium a little further down the road. 

Well, okay, maybe not finally. I do have one more thing to say. I pulled the trigger today and ordered a great big pile of this stuff and will be spending the next few weeks reorganizing and cleaning out my garage. I've got to find someplace for all the pallets to land, once it gets here. Yikes!


Saturday, March 31, 2018

Tan Material Sample Results - Round #3


Are you ready? It's time for another round of sample results. As with every other batch of these I've compiled, I'm really impressed with the creativity, thoughtfulness, thoroughness and talent of the Merry Band of Testers. You guys are awesome! 

Once again, thanks to nosox, Wise Wanderer and Open Space for their very helpful suggestions with respect to questions to help all the testers in their analysis and evaluation of this new material (while helping everybody else to get an idea of what's going on behind the curtain, in the bargain).

And even if you aren't interested in reading through the answers I've compiled in all these posts, the tester carves are fabulous, so that's worth the price of admission right there!! So, with no further ado...

What, if anything, did you to do prep the block before transferring your image?

One sanded half the block, one sanded the whole block, one did an acetone wipe. 

What type of transfer did you use?

One parchment transfer, one pencil transfer, one acetone transfer.

Did it take a transfer well?
Is the transfer clear and high contrast, showing detail well?
Does the transfer stay on the material without smearing or sliding?

All transfer methods worked well, showing good detail and contrast. The pencil transfer stayed on pretty well but did smear after a while, though it could easily be traced over again. The carver who used parchment transfer said it smudged a little on the image that took her more than several hours to carve (the one with the pixie and text), but she did not use StazOn yellow ink to fix the transfer and usually does).


Many thanks to FORAYCH who carved the penny with his unsharpened Staedtler #1 reversed and the dime with a new, sharp Staedtler #1 reversed. Yes, he carved them actual size and the scanned image here doesn't really do them justice. He thought that with a little less elasticity, more crisp detail would be possible. 


What tool(s) did you use?

Old and new Staedtler #1 reversed, sharp and dull x-acto, Speedball modified #1, Speedball #5, Staedtler mini #1 and dissecting pin. 


Using properly sharpened tools, does the cut path have clean edges?
Is the consistency of the block smooth or grainy?


Edges were clean for two of these testers, and mostly clean for one who had to go back and clean up minor residual pieces with small details.


Does the gouge or knife slip during shallow cuts or when ending cuts?

Two had no slipping, one had a little slipping. 

Does the material release easily from the block as you finish each cut?
One said yes, even in corners. One said yes and thought it was much less elastic than OZ Kut. One said pretty well, though it was a little tougher with tiny details.

How would you rate the level of pressure it takes to move the tool through the material? 


One said good, that it was firm, but not as firm as OZ Kut and firmer than SQL. One described it as medium hard. One thought it was easy to move through the material.

Many thanks to Porras Posse who carved this delightful frog (a perfect springtime image!). She sanded the left side of the block and left the right side alone before doing a pencil transfer. Her prints show best coverage with StazOn, but not much difference between the sanded and unsanded sides of the block and the material was firm enough that she had no stray carve marks in her print. She used gouges only. 


Rate the ability to make fine straight lines.


This came in with one 'excellent', one 'very good' and one 'really well'. 

Can you imagine this block at about .25 inches thick? If so, do you think it would be firm enough to hold fine details, or squishy such that stray background marks would show if the stamp were not mounted?


This was not a concern for anyone. All thought it would hold fine details and not squish when printing, even unmounted.

Did you try tools with different levels of sharpness and did it make a difference if you did? 

One thought maybe a little more slipping with the sharper gouge. One said her sharp x-acto worked more smoothly than the less sharp tool and her duller #5 gouge didn't cut as well as a sharp gouge. One said that tiny pieces in small detail areas worked slightly better with a fresh, sharp reversed gouge.


Many thanks to dancing pecan who also tested the detail limits with her magical, fairyland carves. She found the transfer smudged a little after several hours with the book pixie, but noted she hadn't used her usual StazOn yellow ink as a fixative. She liked the material and found it gave her no hand or wrist fatigue. She used the widest range of tools, listing sharp and dull x-acto knives, a Speedball #5 gouge, miniaturized Staedtler #1 and a dissecting pin. Oh, and I know someone will want to know. The pixie with the book is about 2 x 2.75 inches and the mushroom faerie is about 2.5 x 2.25 inches.


What type of ink(s) did you try?


All three of these testers tried lots of different inks. 

Does the carving hold the ink smoothly and evenly?
Do large positive spaces hold and transfer ink well?


On the whole ink held and transferred pretty well, with one noticing some beading and the one who sanded only half the block didn't feel it made any difference in the final print. 


Other observations and comments: 

One noted that black StazOn ink didn't seem to dry as quickly on this material after printing. 

One said that with slightly less elasticity, both sides smooth (the back has a pebble grain to it) and more thickness it would be about perfect for his gouge carving. 

One said the lighter color was a big improvement, release was excellent and elasticity much less than OZ Kut. She also said she could go back and cut closer to a line to get finer detail and she had no problem with hand or wrist fatigue. She liked it 'a great deal'.


Wednesday, March 28, 2018

Tan Material Sample Results - Round #2

What, if anything, did you to do prep the block before transferring your image?

One acetone scrub, two sanding and one did nothing.

What type of transfer did you use?
Did it take a transfer well?
Is the transfer clear and high contrast, showing detail well?
Does the transfer stay on the material without smearing or sliding?

One pre-treated half with wintergreen oil and then transferred with wintergreen oil and yellow Stazon stain as a fixative. The image remained crisp throughout the carve.  
One tried both wintergreen oil and laser/parchment and both worked well, but needed StazOn to keep the transfer from smearing. 
One used a label-back sheet and StazOn mustard to fix the transfer.
One used inkjet on label paper and had to wait for the ink to dry to keep it from smearing. 


Many thanks to Linden Leaf, who tackled an image from one of my favorite artists that was full of fine, curved lines and tons of detail. 

What tool(s) did you use?

Staedtler and Speedball modified and unmodified gouges #1 V and #5 U, X-acto knives, needles, a Meeden #1 parting chisel and a sewing needle.

Using properly sharpened tools, does the cut path have clean edges? 
Is the consistency of the block smooth or grainy?

All in this group found cutting clean and the material consistent and smooth. 


Many thanks to RavenWolf who tried a number of different tools on this varied image and thought the gouge worked best and needles and knives not so well for her.  

Does the gouge or knife slip during shallow cuts or when ending cuts?
Does the material release easily from the block as you finish each cut? 

One had a little trouble with slipping during shallow cuts, but thought it released easily at the end of each cut.
One had no problem with slipping using an x-acto knife 90% of the time, but thought the material required clean dissections to remove pieces (noting that this required cuts to be deliberate and left fewer opportunities for error).
One found it much easier to move the gouge through than the gray sample, but still had issues with knives and needles, noting the pieces held on rather than pop out like PZ used to.
One thought the material was awesomely smooth and that the gouge almost glided through the material without slipping, that corners were crisp, but that slivers had to be helped out sometimes.
 

Many thanks to Team Awesome Pants who usually keeps pink stuff in the refrigerator to keep it from getting too mushy while carving and noted that this material worked better at room temperature. She's voting for a production run. :)

How would you rate the level of pressure it takes to move the tool through the material? 

Pressure came in at about the same as OZ Kut, with one particularly noting that even though this was the firmest material she had used and she was afraid it might be an issue and cause hand and wrist fatigue, but she found it quite refreshing to use and didn't want to stop carving. 

Rate the ability to make fine straight lines.

Both straight and curved lines rated well with this group, with a couple noting the ability to shave small pieces off and make corrections, even without material on the other side of the line to support it. 

Can you imagine this block at about .25 inches thick? If so, do you think it would be firm enough to hold fine details, or squishy such that stray background marks would show if the stamp were not mounted?

This did not seem to be a concern for this group, probably because the block was thick enough to show its lack of squish, where the gray sample was too thin to tell for sure. 


Many thanks to West Dover Quidditch Team, who did a frozen material test, leaving Speedy Carve, OZ Kut and the tan sample in the freezer overnight and tested their ability to print while frozen. The softer Speedy Carve worked best in this application, with OZ Kut and the tan material coming out about the same. 

Did you try tools with different levels of sharpness and did it make a difference if you did? 

One said dull tools didn't seem to matter, one said blades were changed at about the same rate as OZ and one said it seemed to dull her tools more quickly than other media.
 
What type of ink(s) did you try?

Once again, a large range! 

Does the carving hold the ink smoothly and evenly?
Do large positive spaces hold and transfer ink well?

Some issues with printing this time were due to the slight curve of the block, but most got good coverage, with one noting it took more deliberate pressure than softer blocks. One said it held ink smoothly and evenly and one said ink didn't want to stick, noting that she had not sanded or prepped the block before transfer in any way and this might have contributed to the inking problem. One said that not all inks worked evenly and StazOn worked best.

Thank you so much to my fantastic testers - they come up with creative hoops to put the material through that I had never thought of. You can't have too much data. :)

Monday, March 26, 2018

Tan Sample Material Results - Round #1

This particular test installment could probably be entitled something like, "Sunflowers, Bees and a Sting".

In this batch of testers, three finished their images and one didn't. I'll compile the answers of the carvers that completed the test carve first and talk about the unfinished one afterwards. 

What, if anything, did you to do prep the block before transferring your image?
All three of these carvers sanded. One had used acetone last time and commented that she liked the sanding better because it didn't seem to change the surface tension of the material. One sanded the left side only and put an "x" in the upper left sanded corner.

What type of transfer did you use? 

One used parchment transfer, one used heat transfer and one used wintergreen essential oil. 


Many thanks to Baqash who used both knives and gouges in her test. She also gave negative fine lines a pretty thorough testing with her honeycomb and the details on the abdomen of the right hand bee, along with testing  positive fine lines in the wings. She had less hand fatigue with the thicker sample than she had with the thin, gray one. 
     
Did it take a transfer well?
Is the transfer clear and high contrast, showing detail well?
Does the transfer stay on the material without smearing or sliding?

The transfer was clear enough for all three and showed detail well. It was noted that the tan material was much better for contrast than the gray had been. One said she preferred the tan to white. The heat transfer may have been done with a little too much heat - the portion of the block that was returned to me seemed to have melted a bit (which did effect the carving surface, when I tried it out). 

Just as an aside, I have found that it doesn't take a lot of heat to fuse the toner to the block. My iron is set on "2", which is in the permanent press range and very low on the dial as far as the heat setting goes and it works there just fine there - probably not quite as lightning fast as a hot setting would be, but the block won't overheat. 


Thanks to Wise Wanderer who, once again, gave a side-by-side comparison of sanded vs not sanded for ink coverage. The "x" is on the sanded side. She had some trouble with printing, due to the curvature of the block, which should be addressed in the final product. 


What carving tool(s) did you use?

Modified Speedball gouges, #1 Speedball, pinched, Staedtler and Speedball U gouges, Dockyard micro gouge and Fiskers knife.

Using properly sharpened tools, does the cut path have clean edges?
Is the consistency of the block smooth or grainy?

The cut path was smooth and clean for all three. 

Does the gouge or knife slip during shallow cuts or when ending cuts?

Two had no problem with slipping, one had some issue with the gouge, but not with the knife, though she thought that it would be within reach of control with a little practice.

Does the material release easily from the block as you finish each cut? 

Two found the material released easily. One of these also noted that it was easy to remove tiny dot shapes with precision. The third found that cuts needed to be completed fully and that it still had more elasticity than PZ Kut, but less than OZ Kut. Clean up and thinning of lines was also easy. 


Thanks to nosox who ran the block through lines, dots and cross-hatching in this carve. She found this block caused more hand fatigue than the gray one. I'm wondering if the overheated material surface might have played a part in that - it's worth a test to see. 

How would you rate the level of pressure it takes to move the tool through the material? 

Softer than OZ, firmer than pink. 

Rate the ability to make fine straight lines.
This worked fine for all of them, though removal of the string at the end was an issue for one, if the cuts were not complete.

Can you imagine this block at about .25 inches thick? If so, do you think it would be firm enough to hold fine details, or squishy such that stray background marks would show if the stamp were not mounted?

Not squishy. The slight residual curvature of the material from being shipped in a tube did cause a little difficulty with printing, but not too bad and that will be addressed. 

Did you try tools with different levels of sharpness and did it make a difference if you did

This made no real difference to one, was not applicable to one and a sharp gouge made a notable difference for one. 


What type of ink(s) did you try?

Once again, a large variety of inks were tried. 

Does the carving hold the ink smoothly and evenly?
Do large positive spaces hold and transfer ink well?

This was rated pretty well. One said that the large positive spaces printed better than with OZ and perhaps as well as the pink stuff. One found that it depended on the evenness of the pressure applied. One had a little trouble with the curve, but still got good prints.


The Sting:

Finally, let's talk about the sting. I'm not going to try and sugar coat it. Kirbert hated the sample so much he didn't finish his carving. He said it carved like tar with his wire knife and threw the block away. I asked him to fish it out of the trash the following morning and try it again, since he had used an acetone scrub on the block and I wondered if allowing the acetone to bleed out of the block more might help (I have always thought acetone tends to make the surface of any block a bit gummy, so between that and the headache factor, I avoid the stuff). He thought it worked a little better, but still thought I should scrap the whole formula and start over from scratch. Good, honest feedback.

One of the reasons I tried to choose such a wide range of testers (and pretty much everybody who raised their hand this time got to try a sample) is so that I could learn stuff like this. The lesson? Perhaps this isn't a good fit for wire knives - and maybe other tools as well. (I can't test that, since I've never gotten the hang of the wire knife or needle and I create hash with them, no matter what material I use.) 

It was a sobering response to a sample I thought was starting to get pretty decent. And it's  worthwhile to know the stuff could evoke such a passionate negative reaction - it was right up there with Moo Carve. (Grin) It's also probably a good reminder that I may not be able to please everybody, no matter how much I would like to. Even way back in the days when PZ was still available, people still chose Speedy Carve, Master Carve and sometimes even Speedy Cut, believe it or not. And some preferred orange over white PZ (or vice versa). 

It will be interesting to see how the rest of the test results come in this time around.  Many thanks again to all my testers! You're wonderful and I appreciate all your insights! 


Thursday, March 22, 2018

Final Round #1 Tester


This is the final response to the first (very thin, gray) sample. Thanks to RavenWolf for putting this stuff through some seriously detailed tests.

Splitting the sample into two pieces, she lightly sanded the block before doing the parchment transfer and didn't do anything to the wintergreen transfer. Both types of transfer worked well and there was no problem seeing the images against the gray material background. 


Using modified gouges and needles, she thought the material held on too much with needle carving and didn't pop out as easily as she would have liked. She didn't think this would be a problem for gouge carvers, but thought it made carving take longer than it should with needles and knives. Overall, it was a less difficult to cut than OZ, but not as smooth as PZ.

Gouge carving was pretty smooth, but she still had some difficulty pushing through the material, especially noting that if she stopped in the middle of a long, sweeping curve, the material pushed back against the gouge. (We'll see if this is partly due to the thinness of this particular sample, when we get the results on the thicker one.)

Ink did seem to bead up a little on the blocks, even on the sanded piece, but she didn't see much difference between pigment vs StazOn ink. 

Though this would not be her ideal material, she thought that it worked well for detailed carving, making beautiful, tiny lines and holding them well, allowing her to go back and shave off little bits without bending, and allowing for precise corrections.  

She thought it was a marked upgrade from OZ, but still not up to PZ standards.

Once again, feel free to chime in, if I've over or understated, misunderstood or simply blundered somewhere along the way. :)

Thanks again to all the wonderful first round testers. Amazingly, every single one of them signed up for more punishment and will be reporting in round two, as well, along with a few new intrepid testers who joined the merry band.


Wednesday, March 21, 2018

Webfoot's Tan Sample Material Test #2 - Text and Knife

Once again, I sanded the surface before doing a toner-based heat transfer to the sample.


The transfer went pretty well. I didn't worry about getting the transfer past the point where I could see everything well enough to carve it. I think the contrast on this color is much better than it was on the gray sample.


I did my first test print with my cheapest dye ink on a fairly porous piece of scrap paper - I didn't think of it at the time, since I was sort of focused on the carving part of the process, but I should have used the same paper I sent out to all the testers. D'oh! So, the ink coverage wasn't great, but that's not what I was looking for at this point in the process. I wanted to see if the letters looked clean or ragged. They looked pretty clean. 

I found that the fresh, sharp Testor's knife carved through the sample very nicely with good control in little corners and interior spaces, as well as 's' curves and other areas that can be challenging for me. I also tested the block with a well used, dull knife that I had sitting on my table and it didn't carve nearly as well as it did with the sharp one. I discarded that knife as a tool pretty quickly. So, for me, the sharpness of the blade made a clear difference.  


Another test print on another scrap with the same dye ink. Even unmounted, I didn't have any trouble with stray carving marks being printed where I didn't want them, so the material was firm enough to withstand a decent amount of pressure. 


Here's the final print on the nicer index paper using Brilliance pigment ink. I mounted the carving on a small acrylic block  For size reference, the acrylic mount is one by three inches. 

The sample was sent to me curled up in a tube, so there was a bit of concavity to the carving surface. It didn't bother me while carving at all, but it might have been a problem for printing, without the acrylic mount - of course, an eighth inch is still too thin for me to manage without a mount anyway, so I'd have had trouble in either case. If my tester results come back positive enough and I decide to have a run of this material made, I'll have to make sure that it comes out flat.